Getting Started
This short guide will help you get up and running quickly with We Delivered It. We will be adding new content to this guide regularly, so check back often.
Sign Up
First step is to sign up for a plan. Choose the plan that suits your needs and get started. You can choose to sign up with an email and password or with a Gmail account. Once you have signed up, you will be taken to a simple onboarding page where you can add team name. This can be your company name or any other name you want to use to identify your team. You can change the name anytime from the settings page.
Please note that the free version of We Delivered It is limited to 1 user and 3 active deliveries at a time. If you need more users or deliveries, please upgrade to a paid plan.
Profile & Team Settings
To edit your profile and team settings, click on the Settings on the menu on the left. The first tab displayed will be your personal profile. Here you can set yopur name and profile picture. You can also change how you sign in, your email address and your password from here.
Select the Team tab to edit your team settings. You can change your team name, logo and add an address, email address and contact name. This team name, address, email and contact name will be printed on the proof of delivery pdfs.
Please note that the logo image will be cropped to a square and sized to a maximum of 200px x 200px.
Add Team Members
If you are on a paid plan, you can invite team members to join your team. You can add as many team members as you want, however, if you go over the limit of your plan, you will be charged for the extra users.
To invite a new user, click Settings on the menu on the left, then click Team tab, and then click Members.
Then click Invite Members button.
Enter the email address of the user you want to invite and select the role you want to assign to the user.
You can assign the following roles: Owner, Admin, Member and Driver.
You can create multiple invites at once by clicking + Add another one. Once you are finished, click the Create Invites button.
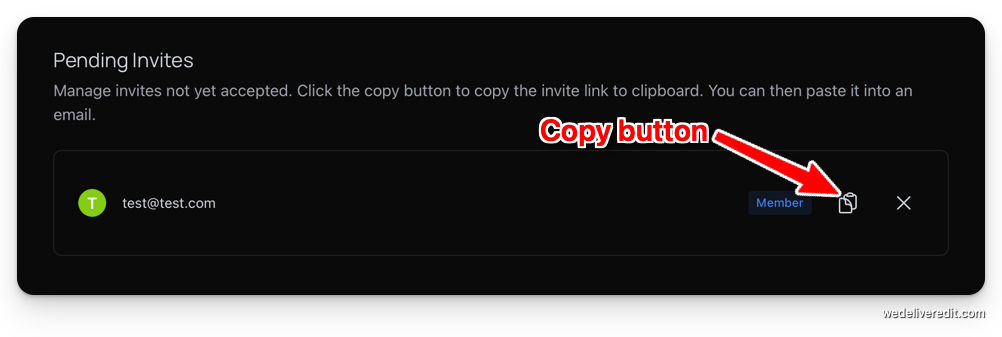
The new invites will be displayed in the Pending Invites section. You can copy the invite link by click the copy button and send it to the user you want to invite. See the image below for an example. You can also delete the invite by clicking the X button. Once an invite has been accepted, it will be moved to the Members section.
Any existing members will be displayed in the members section.
Clicking the three dots to the right of the member name will display a menu with the following options: Change Role, Transfer Ownership and Remove.
Add Vehicles
You can add vehicles to your team. Vehicles are used to assign deliveries to. You can add as many vehicles as you want. You must be logged in as an owner or admin to add or edit vehicles.
Click on vehicles on the menu on the left and then click New Vehicle at the top of the page. Fill in the vehicle name and description. When you are done, click Create Vehicle.
To edit a vehicle, click on the vehicle name on the vehicles page to expand it. Then click the View/Edit button. You can change the name, description, and add an image. Once you have made the changes, click the Update Vehicle button.
Please note that vehicle images are cropped to a square and sized to a maximum of 200px x 200px.
Start Adding Deliveries
Once you have added at least one vehicle, you can start adding deliveries. Click on the Deliveries on the menu on the left. Then click New Delivery at the top of the page. Fill in the delivery details and click Create Delivery. The minimum information required is the order #/name, vehicle and the date. You can optionally add a customer name, an address, a description, and a delivery time slot.
Please note that if you do not enter a delivery address, you will not be able to use the location distance or popup map features.
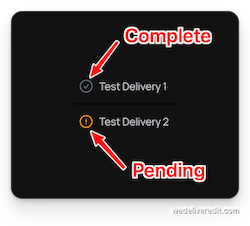
Deliveries are listed grouped by date. You can expand a delivery to view the details by clicking the delivery name. Complete deliveries will have a grey checkmark and pending deliveries will have an amber exclamation mark. See image below.
When a delivery is marked as complete, the PDF button will be visible. Clicking the PDF button will generate a proof of delivery pdf and automatically download it. You can email this to the customer if needed.
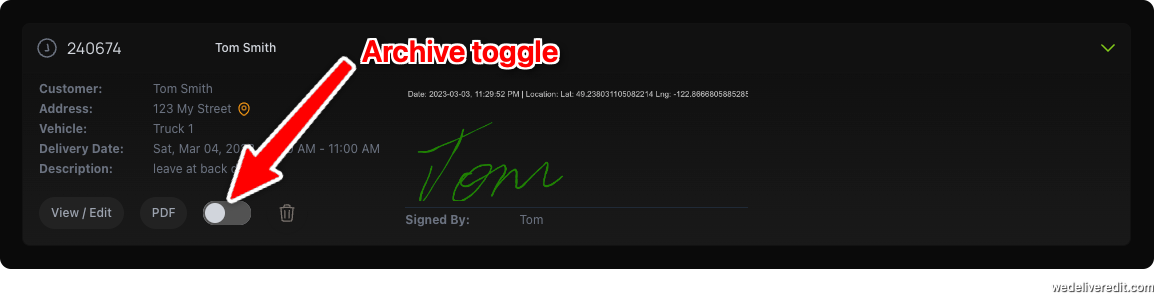
When a delivery is marked as complete, it can be archived. Archived deliveries are not displayed in the deliveries list, but can still be viewed by searching the archive. To archive a delivery, expand the delivery and click the Archive Toggle. See image below.
Click the View/Edit button to edit the delivery. When editing a delivery, you can change the order #/name, customer name, address, description, delivery time slot, vehicle, and the delivery status. Once you are done, click Update Delivery. once a signature has been added to a delivery, and saved, it is locked an cannot be changed again. The same applies for the two photos.
If you are logged in as a driver, you can only add a signature, enter who signed it and edit the description. You can also add photos of the delivery
Click the trash bin button to delete the delivery.
Team Messages
Team messages are a great way to keep your team informed about any important updates. For example, reminding them of procedures or letting them know when certain vehicles or drivers are not available. You can add team messages from the team messages page. You must be an owner or admin to add or edit team messages. Messages are displayed on the dashboard for all users.
Please note that team messages are not included in the free version of We Delivered It. If you need this feature, please upgrade to a paid plan.
To add a team message, click on the Team Messages on the menu on the left and then click New Message at the top of the page. Fill in the title, message and select the importance of the message. Once you are done, click Create Message.
To edit a message, click on the message title on the messages page to expand it. Then click the View/Edit button. You can change the title, message, importance, and add an image. Once you have made the changes, click the Update Message button.
Please note that message images are cropped to a square and sized to a maximum of 200px x 200px.
Dashboard
The dashboard is the first page you will see when you log in. It displays the total deliveries, pending deliveries and any active team messages. There are also buttons to add a new delivery and view deliveries. If logged in as a driver, the New Delivery button will not be available.